Dots have visual information
Drag dot
The dot on the left of the text is for for selecting an idea, and for dragging it around. To indicate that an idea is selected, the color of the dot is filled in (as in the illustration below).
You can browse the map by using the arrow keys. This changes the selecetion.
To move an idea, select it and then hold the OPTION key down as you use the arrows. You can also click on the dot and drag it.
This dot is sometimes decorated with a line or a tiny dot. A vertical line means that this idea is not writable except by the person who originally created it; this means you cannot change it’s text, nor add or remove child ideas. A tiny dot means that you can add child ideas to it, but not edit it. No decoration means you can do both (edit it and add a child idea).
!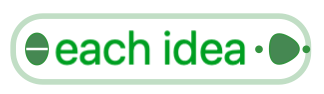
Reveal dot
When the dot on the right-side is visible, click on it to reveal and hide subordinate child ideas. When an idea has no children, this dot will not appear. Hidden children is indicated by inverting the color, as above.
When this dot contains a little dot at its center, it is a bookmark or a hyper-text link. If you click on a bookmark’s reveal dot, your map will refocus at the idea from which the bookmark originated. If you click on a hyper-text link’s reveal dot, a web browser will open showing you the content of the hyper-text link.
Around this dot may appear tiny dots (e.g., the two tiny dots around the reveal dot, in the figure above). These tell you how many children will be revealed when you click it. No dots means only one child.
!
This tiny-dots feature is enabled by choosing “dots” from the “counts of subordinate ideas show as” Preference in the details view (see figure, above). In books on communicating information, a rule of thumb: visual cues count, too. Use this selector to discover which cues you like best.